Before you start
- Select a course: White, Yellow, Orange, Green, or Red? [Courses]
- Get registered
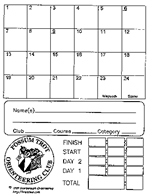
[Registration]
- Fill out registration form, pay fees
- Receive: blank orienteering map, clue sheet, control card, protective cover
- Beginner instruction:
- Usually at 10:30 a.m. on Saturday or 12:30 p.m. on Sunday events but can be scheduled whenever you have finished registration. Call ahead if you have a large group.
- Basic instruction includes: course copying from master map, orienting the map, orienteering symbols and techniques, start and finish procedures, etc.
- Copy your course (if you have not received a pre-marked map)
- The map table will have master maps of all courses available. Choose your course from among the maps.
- Take care to center your control circles exactly the same as the Master Map. The standard diameter of a control circle represents 100 meters, so a little error in copying could result in a big error in the field. Take care to not obscure any map detail. The lines between controls indicate the order in which to navigate them; you do not need to follow the lines exactly when on the course. The fastest route is probably NOT the straightest route.
- Be sure to copy the Start triangle and the Finish concentric circles.
- Proceed to the Start when you are ready. The White (Beginner) course may take over an hour to complete.
Start procedures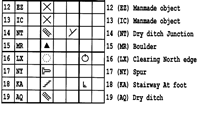
- Keep your control card available; the start official may need to write your start time on it.
- The start official will record your individual or group name and assign a start time on either a printed start list or on laptop computer. He may assign a "virtual" bib number which should also be recorded on your control card. The bib number will be used to identify you when finishing.
- There is usually at least a 2-minute interval between starts on the same course. 2 or more competitors may start at the same time if they are on different courses. You may have a short wait if there are many ahead of you on the same course.
- Proceed on your course when your start time is reached.
On the course
- Navigate carefully to the controls in numerical order. Stay in contact with the map; know where you are on the map at all times.
- At each control:
- Check the control code to insure it matches the clue sheet. There are many controls in the field for the other courses, some of which may be very near your correct location.
- Punch your control card in the correct square, making sure the punch marks are entirely within the square.
- Re-orient the map to aid navigation to the next control.
- If you get lost:
- STOP! Aimless wandering will not correct itself. You must relocate.
- Find a definite feature that you can correctly locate; e.g., a lake, large stream, major path or road, cliff, etc. It must be prominent enough to not be confused with other features.
- If you are still lost, follow a Safety Bearing to the main park road, highway, river, etc.
Finish procedure
- Always return to the finish, even if you do not find all of the controls. The meet officials need to know that you are safely out of the woods. We do not appreciate waiting for someone who already went home.
- If the computer is in use, yell your bib number to the finish official. He will input your bib number and hit the enter key when you cross the finish line.
- If the manual start/finish list is in use, identify yourself so that the official can note the correct time by your name.
- Timing ends when the last person of a group crosses the finish line, so stay together as a group.
- Hand in your control card to the finish official. He will record your finish time, elapsed time, and check for the correct punches.
- The control cards will be displayed on a results string in elapsed time order. Please notify the results officials of any discrepancies.
After you finish
 Don't rush off after your run or walk. Check your results and compare route choices with others on your course. Ask more experienced orienteers how they would have done some of your routes. Enjoy the snacks which are usually available. Don't rush off after your run or walk. Check your results and compare route choices with others on your course. Ask more experienced orienteers how they would have done some of your routes. Enjoy the snacks which are usually available.
To get even more experience, volunteer to help pick up the controls. The course setter will assign you a group of controls in an area, some of which may be the advanced controls. Or ask to go with an experienced orienteer while he picks up the controls. |
|